Unit 01: Keetra Dean Dixon
Question: How can you translate what you see into a graphic language?
In 1919 Kandinsky wrote an essay in which he used the metaphor of verbal “language” to discuss the laws of visual form, calling simple geometric shapes “forms belonging to the first sphere of graphic language.” He came up with the full metaphor of “visual language” not long after and it has since become a foundational concept in the study of graphic design.
In this assignment we’ll use the basic structures of language to lead an interpretive deconstruction of our surrounding, transforming them into a distinct graphic language. Just as paragraphs can be broken into words and words can be broken into letters, we’ll break photos of our environment into their basic formal elementals. We’ll translate those elements into new graphic forms, exploring a variety of materials and tools as we go. Your collection of forms will then be used to create new compositions, a graphic language all your own.
Learning Objectives:
• develop new form from what you see
• exercise an understanding of gestalt principles
• explore traditional and nontraditional tools & materials
• develop a distinct visual voice
• practice transparency of process & generosity with creative methods
Week 1
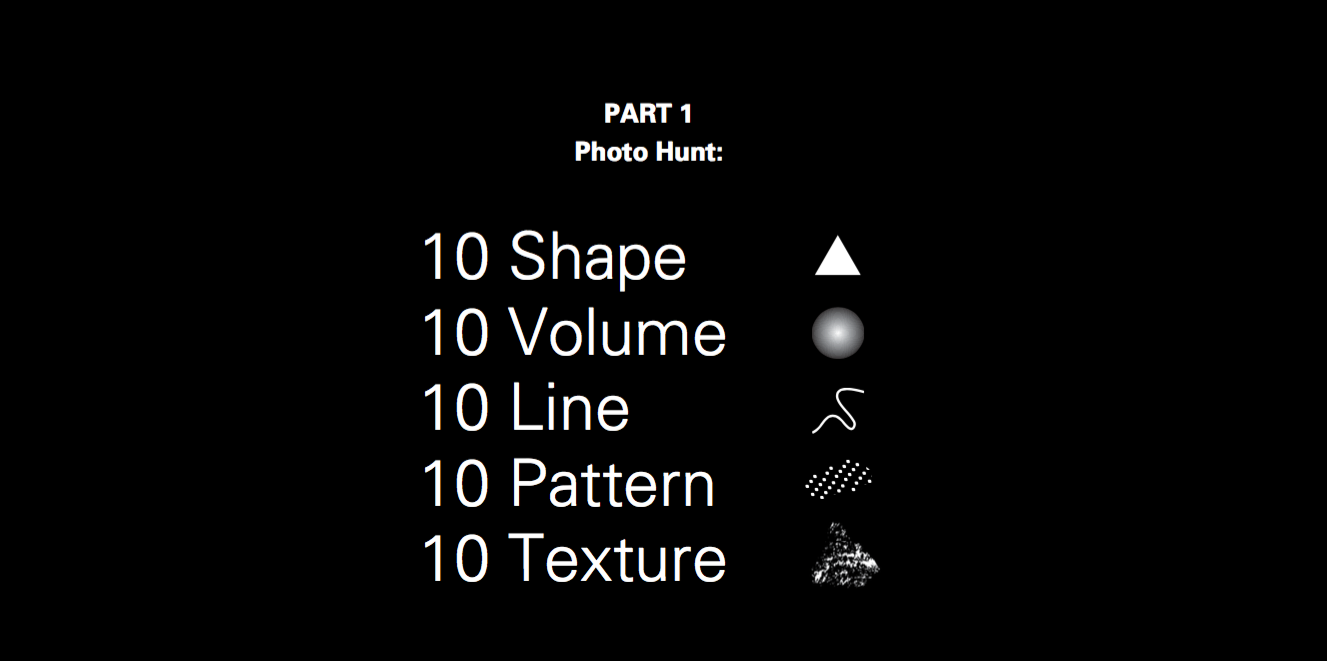
PART 1
Photo Hunt for Form. 1 hour. During Class.
>Shoot a minimum of 10 photos for each of the following categories.
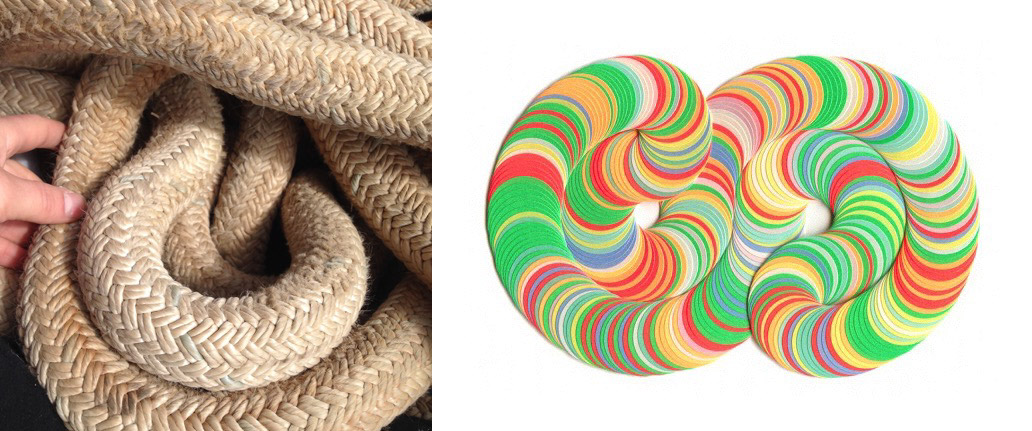
• Shape
• Volume
• Line
• Pattern
• Texture
Shoot Quickly!!! Don’t belabor the creation of these photos, you will be transforming them later. You are hunting for potential. Look for the inspiring, the beautiful, the curious, anything the prompts a graphic translation. Speedily capture what’s you see and start looking for the next opportunity to photograph. Seek diversity in your collection of images. These are your sources to work from later, take as many pictures as possible within the allotted time.
Return to class and prep for a casual, gallery style, laptop sharing.
PART 2
Create a collection of 25 grayscale, graphic forms.
You’ll now translate your photos into graphic form using a variety of materials and tools. Your final collection will be digital, but you’ll start with physical studies. Begin in class, then continue the process on your own.
In Class:
You must use each of the 5 Non-Traditional materials provided in class to begin your form translations. You may mix materials with one another, and use any additional tools you please.
After Class:
You are free to use the materials and tools of your choosing.
Non-traditional Materials & Tools (Use at least 5)
• needles
• thread/string
• marshmallows
• tissue
• toothpaste
• Vaseline
• salt/paper
• straws
• QTips
• balloons
• cotton balls
Traditional Materials & Tools (Use at least 5)
• paper
• tape
• Xacto knife
• mark making guides: S curve, ruler, stencil
• mark making: sharpies, pens, pencils, india ink, gouache, acrylic
• Adobe Suite: Illustrator, Photoshop, etc
• documentation tools: camera, scanner
• code: processing, javascript, etc
• 3D software: Cinema 4D, Blender, CAD, SketchUp, etc
Translation Process:
Look at an individual element in your photo then translate it into a graphic form. There are no strict rules for the process of translation. It might be a simple procedure: Sketch an element, then scan that sketch. Or it might be several steps: Build a structure that mimics an element, then photograph the shadow cast by that structure, bring that shadow into photoshop and refine further, then map that image onto the surface of a digital 3D form. Create physical structures, mark make by hand, manipulate lighting, alter image with code, etc. Anything BUT the original photo can be used as a graphic form in your collection. The idea is to translate and evolve a new visual language distinct from, but inspired by, your original photos. Your voice will reveal itself when greater interpretation is required. Your tools and materials will reveal their influence in the translation process.
Pursue more than 25 studies, you’ll narrow and refine later. Start fast, creating looser studies and sampling a range of materials quickly. Misuse or intermingle materials and tools to force unexpected results. When you discover a promising process, put more time into crafting the technique. Keep your camera close or be ready to take screen shots. Document the steps in your technique to share later. A successful technique does not need to be complex, the strength of the final form determines its worth. As you work in class, keep in mind that your final collection of graphic forms will be digital. Digitize your physical work before the end of class or make a plan to cleanly transport your physical studies for continued work at home.
Homework
Now is the time for editing. Review your source photos for new opportunities and assess your work from class. Notice themes and similarities, consider the diversity of your in process collection. When narrowing down your collection, seek contrast of structure, scale, weight, line, density, mass, simplicity, chaos, etc. Select the strongest forms for clean up and refinement. Continue developing new forms to flesh out your collection, always looking to your source photos as a starting point. Work on new forms by hand, digitally, or a mix of the two.
Lecture
 See lecture slides on Google Drive
Due Next Week, Sept 20:
A single pdf (made from inDesign or Keynote) formatted horizontally (landscape) with:
• Cover page with your name, date, Unit 1: How can you translate what you see into a graphic language?
• 1 summary image of all 25 graphic forms.
• Detail shots as needed: Graphic forms with fine detail can also be featured larger scale in additional pages.
• Process for 5 graphic forms: Pick 5 of your favorite forms or forms with interesting process and tell us how you did it. Be prepared to casually explain the steps involved, providing visual references as needed. Use the photos or screen shots taken earlier.
Week 2
Due Week 3 / Sept 27
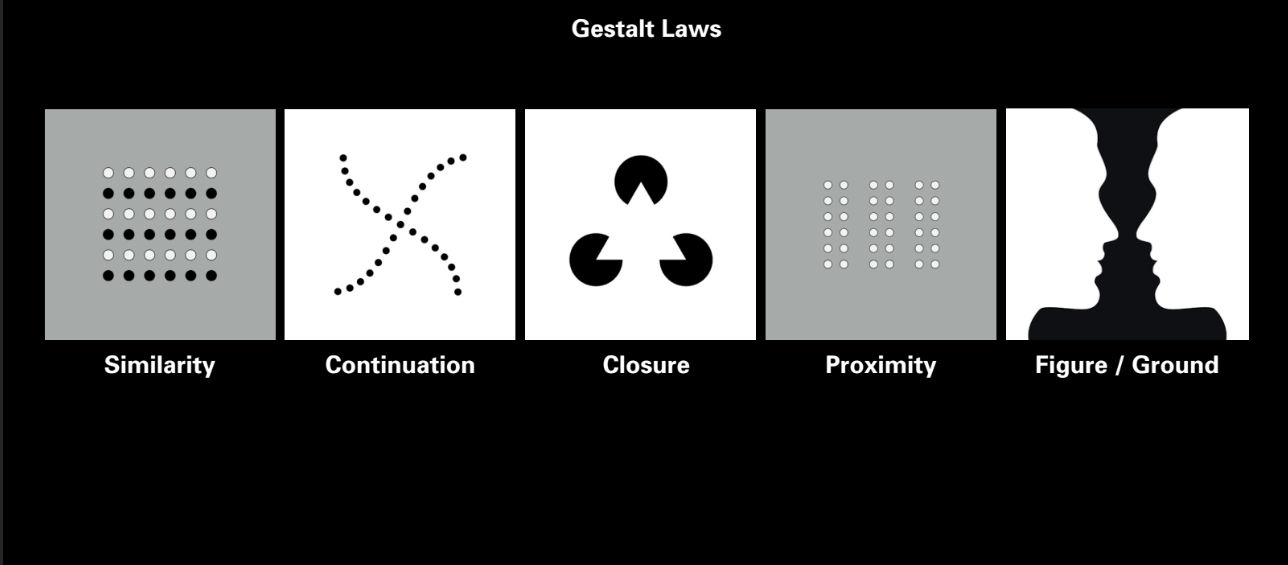
Revisit your 25 studies and look at them with fresh eyes, through these five gestalt principles of similarity, continuation, closure, proximity, figure/ground.
Create 5 new compositions using the 25 studies as a kit. 10″ × 10″. Black, white, & 1 color. No rules for color applications. Each composition should be based on one of the following gestalt principles of perceptual organization.
Each composition should be based on one of the following gestalt principles of perceptual organization.
Demonstrate:
• Similarity
• Continuation
• Closure
• Proximity
• Figure/Ground
Compositions should be printed and mounted to presentation board. Trim board flush with edge of the print. Label each with your name and date on the back.
• Mounting Supplies in RISD store:
• Museum Board Black 4 ply, 32”x40” $19.75
• Double Tack, $7.05
One print will be collected by your teacher for a show in the GD Commons at a later date.